
Funky Search Results
While working on one of our new house renovation projects, I was doing some research online and noticed that one of the contractor's websites wasn’t working right if I looked it up in Google, but it worked fine if I searched from DuckDuckGo. In fact, judging by the Google results, it looked like his site was hacked.
Here’s the detailed behavior: If I plugged this contractor's name into Google and pulled up his website, the summary contained a little bit of his info, but the title and remaining content referenced an online gambling site. The link for his site looked correct, but if I clicked into it, I was instantly dumped into an URL forward that landed on a gambling site, with back button disabled.
If I did the same search in DuckDuckGo, his website looked and acted fine. Likewise, if I came in from a clean link (such as a referral link on the product website), or if I typed in his URL directly, I got to his clean, normal page.
We’ve all heard about sites getting hacked and overwritten badly, but this was novel since it only affected search engine results. At first, it almost seemed like it was Google’s search results that got hacked. If I opened his index.html page, it was perfectly clean, with nothing bad hiding in the source. It wasn’t even a complicated website - just a single page with his work info and contact details. No menus, contact forms, multi-pages, etc. But failure through a major search engine can’t be good for business!
It turns out the hack works on the behind-the-scenes files. The site was most likely targeted through an XSS attack, or perhaps by it being run with an obsolete version of PHP living on the server that allowed hackers to break in and overwrite content within the site.
The search engine hack works like a tripwire. The hackers overwrite the .htaccess file or modify one or two PHP files, causing an URL redirect if - and only if - a user enters the site via one of the “tripwire" routes, such as coming in via Google or Bing. It can not only trip on the search engine, but it can also detect based on the user agent used, for example using IE or Firefox. The site owner might not notice the issue because the regular html files remain clean and the direct URL works fine. Some owners don’t even begin to look for the issue until they notice a sizeable downsize in site traffic, or a customer reports the issue.
Here is a sumary of repairs to address this hack:
- Repair the .htaccess file (in the root directory) if it was hacked, and modify it to block future XSS attacks (details in the links below).
- If PHP is running on the server, upgrade it to at least 5.3.X.
- If using WordPress, use the Bulletproof Security plugin.
- Examine all files for the hack, and strip out the forwarding line of code that has been added to them (sometimes in PHP files, for example those found in the wp-content directory)
You can monitor the behavior of your website from different search engine referrers or user agents using this tool:
https://aw-snap.info/file-viewer/
The tool above can actually help you identify specific lines of suspicious code in the site.
There is an excellent technical explanation of the hack here:
For additional reference material, check out forum discussions such as these:
https://productforums.google.com/forum/#!topic/webmasters/AGcTYi0Me3E
https://productforums.google.com/forum/#!msg/webmasters/6dPdJhz7nYc/qLwRIb-MAwAJ
https://productforums.google.com/forum/#!topic/websearch/fU6aj5DjCNs
Thanks for the (Used) Memories
This IEEE article from 5/4/18 discusses a new technique that can be used to tell how old flash memory is. This is important because it gives Engineering and Manufacturing a method to identify substandard components even before they go out on product to the field.
Device counterfeiting is an ongoing concern for electronic products. Even if you are ordinarily buying components from an authorized distributor, things sometimes still go wrong due to lead time and sourcing pressures.
If you are building an electronic product that requires new flash, but inadvertently receive a batch of used flash (recycled but sold as new), your product quality may be adversely affected. Your design may require a high level of MTBF (mean time between failures), but recycled used flash could decrease your product’s life span and reduce MTBF.
For a company concerned about unintended builds with used flash devices, using the article’s discussed erase-time method during the manufacturing test process could identify such substandard flash, allowing it to be identified and sequestered, preventing future quality issues due to prematurely failing flash.
The Saga of Turning Our Old G4 into an Apache 2 Web Server
Episode I - Attack of the Hard Drive Clicks
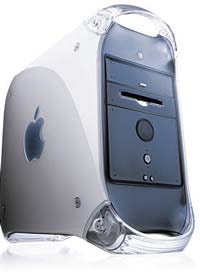
A long time ago in a galaxy far, far away… we bought a Yikes! Power Mac G4. It came out in 1999 and was described as Apple’s first serious pro computer, a supercomputer by the standards of the time. This awesome desktop machine served us well for many years. Using this G4, I designed our websites with Dreamweaver, ran CorelDraw to make gifs for our pages, and used other mundane applications like Microsoft Office X and iTunes.
Alas, this wonder machine was eventually superseded, and it faded into second class status next to our newer toys. However, I’m not one to discard something that still has usefulness, so it continued to perform background work as our web server for Pussicam (our cat website) for a long time, until one day, about five years ago, it produced the hard drive click of death.
I was very busy at work and home at the time. I quickly relocated the cat web site to run somewhere else, and just let the G4 collect dust under my desk, hoping to eventually have time to open it up and see if anything was salvageable.
Fast forward five years: When I was laid off at the end of 2017, I suddenly found I had time to catch up on all of my neglected To Do projects, like recaulking our shower, painting rooms, and figuring out what to do with the large paperweight sitting under my desk.
I pulled out the machine and opened it up. I knew it had two hard drives, but I didn’t remember much else about the system. I figured the main hard drive that booted the machine was dead, and with everything being so old, I didn’t have much chance of resurrecting it. But it was still worth a shot.
I disconnected the G4’s drives from their IDE cables and connected each one in turn to my laptop via a very handy gadget left from a previous hard drive debug effort, the Sabrent USB 2.0 cable to Serial ATA (SATA) and IDE Hard Drive interface (something like this gadget, but an older model). This device allows you to access any hard drive from another computer and is very handy both for debugging faulty drives and for transferring data during a computer migration.
The main drive was still Mr. Clicky, but the second drive worked fine; it’s data was fully visible to my laptop. But that was still no guarantee that I had ever made the second drive bootable. I verified the drive’s jumper settings, put it back into the machine in the first IDE connection, and powered the G4 on.
Two minutes later (it is very slow booting) my old G4 was alive and well. It turns out that many moons ago, we had apparently replaced another dying drive and installed Carbon Copy Cloner to set up the replacement. This backup drive was a fully bootable clone, with higher capacity than the original drive, and worked perfectly.
Not only that, but as I browsed around the drive, I discovered it still held some old photos of my grandmother from her youth and a few original short story and poetry Word documents I had written, data which I forgot to migrate over when we were moving to our newer computers. It was a good day!
Episode II - Revenge of the SSD
Now, in the intervening five years since the G4 had died, I have maintained our websites in various locations. Getting the G4 back up and working opened up the possibility of using it again as our main web server. Why would I do this? Let me tell you a story...
So, as I explained in Episode I, the G4 had been running our cat website Pussicam for years. But the G4 was running Apache 1.3, and I never figured out how to make it run more than one website, so I’d been serving our family website Oreganet out of Dropbox during the same time period.
Dropbox worked great because it was basically free for low level users like us, and it was reliable. We’re just running personal websites for family and fun, so it wasn’t worth paying for a web host provider.
After the G4 died, I just moved Pussicam to run out of Dropbox, right alongside Oreganet. The URLs were a little funky, but it was still free and easy and reliable.
Unfortunately, all good things must come to an end, especially when they’re free. Dropbox announced that as of October 3, 2016 they were discontinuing the ability to render HTML content in-browser.
So I had to migrate our home websites one more time… and this time I moved them to my current computer, a Macbook Pro. Macs are easily run as web servers, so this was pretty trivial. The URLs were still kind of funky, until I figured out how to set up virtual hosts. But there was one big problem.
My laptop has a habit of either going to sleep or losing its internet connection when not in use. This routinely happens when I forget to plug it in. I have the energy saver set to keep the computer on when it’s AC powered, but sometimes the energy saver forgets the stay-on setting and reverts to power saving shutdown after fifteen minutes. So if you stopped by Oreganet at night or when I was on vacation, there was a pretty good chance that the website wouldn’t be alive. Not the most reliable!
But the G4 doesn’t go to sleep. It’s a perfect web server. Except that it was down to a single very old hard drive and running Apache 1.3. More on Apache in the next episode.
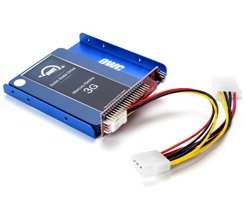
The first order of business was to get a new backup drive installed. I shopped over at Other World Computing and found the perfect solution for about $100: the 120GB OWC Mercury Pro Legacy 3.5-inch IDE/ATA Solid-State Drive Kit. This solid state drive is likely to be much more reliable than the old style spinning hard drive it was replacing. It comes with an IDE/SATA converter board, cable, and metal sled for mounting. And it’s compatible with my very old G4!
When it arrived, I prepared to install it in the machine. I thought I would make use of the metal sled to mount it on top of the primary drive. I plugged the SSD into the converter board SATA (the black header), noting that the design engineer picked an oscillator that was slightly too tall (poor clearance with the side of the drive) — should have used low profile! It barely mated. I plugged in the power cable and mated the G4’s IDE cable to the converter board (header, other side). Mounting options were limited, but I found one screw that seemed to line up just right on the left side and fixed the sled in place against the other drive’s metal carrier. Then I closed the bay door and heard a small and slightly worrisome click. I booted the G4, but there was no second drive visible.
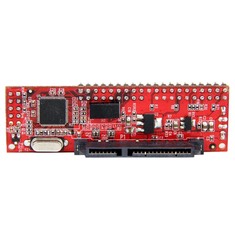
Powering off, I opened up the unit and found, to my dismay, that the fit with the SSD and the IDE cables and the converter was just a little too tight, and the SATA header housing on the converter board had dislodged and cracked off the PCB, bending the pins. The pressure from the short IDE cables caused too much torque in the tight space when I closed the bay door. The SSD itself appeared to be fine, thankfully. To be sure, I hooked up the Sabrent cable and checked it with my laptop, and it showed up. I contacted OWC for help. The damage wasn’t really their fault, so I knew I’d have to replace the broken board myself. They emailed me the part number to order a replacement board, but I actually found it cheaper elsewhere (about $15). So at least my mechanical mistake wasn’t too expensive.
The new converter board arrived two days later and I went back through the process of installing the SSD. This time I did NOT mount the sled but left it free to slide on top of the other drive. I closed up the bay very slowly and carefully, feeling for any undue tension, and then booted up. Tada! The SSD was recognized.
I ran Carbon Copy Cloner to make a fully bootable backup drive to keep the G4 happy and healthy. With my drives working great, it was time to get back to the Apache upgrade.
Episode III - The Software Strikes Back
I knew that if I was going to make the G4 our web server again, I really wanted it to run Apache 2. Oh, I’m sure 1.3 would have worked, but I really liked how my laptop, running Apache 2.4, served our assorted family web pages. I’ve been thinking of dabbling with PHP as well, and I wanted the latest tools. And it was nice to have a fun technical challenge to keep my engineering brain working while I’m job hunting. So why not?!
Oh, and since I’d just cloned my hard drive onto the SSD, I knew I had a clean backup, just in case I really messed up and needed to do a full restore. It’s good to be prepared.
I confirmed that it was indeed possible to upgrade Apache on a mac running 10.4.11 Tiger. It didn’t look too hard, judging by this article. You know, kind of like when you buy some DIY furniture and you sort of skim the instructions and it looks easy?
I meandered over to Apache, downloaded 2.4, checked signatures and hash, and discovered somewhere in my readings that I’d need a compiler (GCC). Yeah, I probably should have realized I was going to need a compiler.
It is worth noting here that I am a hardware engineer. I don't deal with software that often. I play with circuit boards & schematics, oscilloscopes & logic analyzers. I sometimes write verilog to run a baseboard FPGA. I provide explanatory spreadsheets and detailed design notes to my fellow software engineers who then generate the code to run my boards. At work, on those rare occasions when I’ve installed custom software on a server, I’ve had expert help. At home, I’ve mostly just installed ordinary GUI-based applications using Apple disk image “dmg” installers. So I am not well versed in running “./configure, make, make install." I proceeded with extreme caution. I read a lot online to try to understand what I was doing.
I found out that for GCC on the Mac, I needed Xcode. This would be easy if I were installing it on my laptop, but it was a much different challenge on my very old G4. I’d never needed Xcode before, and a much older legacy version was required for my 19 year old mac. (Go ahead and laugh.) I hunted online for tips for an hour and searched around Apple’s website without success, continually encountering stale links. I then found out that Xcode originally came with the OS installation disc, so I searched our shelves, dusted off the box, and installed 2.0, hoping it would be good enough. Only Xcode wouldn’t install while I had low disc space (~10Gb). The installation notes indicated that you need adequate space for the final step of optimizing performance. I eventually cleared about 25Gb by deleting some old podcast files to allow installation to work. I set it going and waited. And waited. The final installation took all night, but in the morning I found it was a success.
Feeling a bit more hopeful, I tried to install Apache 2.4, which promptly gave me an error that I needed PCRE.
It was at this point that I realized I probably should have read the Apache installation page a bit more closely.
Not only did I need PCRE (the Perl-Compatible Regular Expressions Library), I also needed APR (Apache Portable Runtime (APR) project) and APR-Util. I made myself a checklist to ensure I didn’t miss anything else.
The Apache Portable Runtime (APR) project was the only thing that installed without issue.
The APR-util was another matter. APR-util gave me errors about missing expat.h, which then led me down the rabbit hole of trying to find something called yum, a package management utility. I found out that yum is for Linux but won’t work on OS X. According to this article, I’d need either Homebrew or Macports. Homebrew, billed as the “missing package manager for macOS”, requires OS X 10.10 or higher. So instead, I installed Macports, only to realize I still really needed to be able to run “brew" from Homebrew. So I went back to Homebrew and found that there was an experimental fork called Tigerbrew that would run on 10.4.
Unfortunately, the ruby installer script failed to run, so I went back to try installing PCRE. Only PCRE was obsolete; I had to install PCRE2. That took quite a bit of fiddling but I eventually got it working.
I then came back to where I’d gotten stuck before. Installing “expat" needed “libtool” and “libtoolize”. Some online tips suggested using "apt-get", which bounced me back to Homebrew and Macports. I tried using Macports to attempt to install “libtool", but it failed because my Xcode wasn’t version 2.5.
(And yes, my head was also spinning. I read a lot of stackoverflow.com webpages trying to figure all that out.)
I was thoroughly stuck. I went back to Apple’s developer website to try and find 2.5 again, but this time I followed a different path in and finally got hold of Xcode 2.5. At last! And it installed successfully.
At this point, I went on vacation. Which was probably a good thing.
Episode IV: The Voyage Home(?)
Three weeks later, after a very nice vacation in St. Augustine, Florida, as well as painting two rooms in our house, I returned to my pet technical project.
I gave up on the expat and libtool errors and revisited Tigerbrew. It was clear I really needed Tigerbrew.
Unfortunately, the ruby script that was supposed to install Tigerbrew wouldn’t run. (I didn’t even know what ruby was when I started this process, but at least it was already installed on the G4.) I figured out how to manually install Tigerbrew by deciphering the install script’s assorted commands. It involved creating folders, moving files from the unzipped Tigerbrew tar, exporting a PATH variable, and setting permissions and file/folder ownership correctly. Thankfully, no compiling was required. I then had additional issues to repair after running “brew doctor” (a handy checker!). Tigerbrew’s installation also included installing curl and git (at least I knew git from work). It took me two days to work through several issues, but eventually I reached the point at which I could actually run the “brew" command.
In hindsight, I suspect that if I’d successfully installed Tigerbrew much earlier in this process, I probably could have installed everything a lot more gracefully.
I finally installed apr-util without errors. But Apache 2.4 still wouldn’t install due to some kind of issue where it kept looking for PCRE instead of PCRE2 (I tried a linking fix, but that didn’t work). I used brew to fix the issue (by basically installing PCRE, “brew install PCRE"), and then finally, after so many challenges, I successfully installed Apache 2.4.
Of course, my Apache upgrade saga wasn’t quite over. For the easiest part, I transferred our websites over from the laptop to the G4 and fixed up virtual hosts on the new machine. But no matter what I tried, the G4 kept serving the files from the old WebServer folder, ignoring my virtual hosts in the new Sites folder. After all that effort, I couldn’t believe I was going to be thwarted by this last issue.
After a long break for dinner, I fiddled with the StartupItems for Apache and learned how to create a new launch daemon for Apache 2.
About 10 o’clock at night, after fixing and fiddling with startup and virtual host settings all day, our websites finally loaded properly from the Sites folder, and Apache 2.4 was running from boot. At last, success!
And amazingly, I didn’t break my old computer. (I hope!)
So, if you are reading this post around April 2018, you are being served site pages by our G4 bought in 1999! Oreganet now runs 24/7!
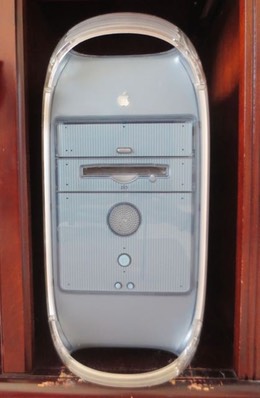
Meet our Yikes! G4 (circa 1999). It runs our web server, which hosts Oreganet.
Disclaimer: Neither Jedi nor humpbacked whales were harmed in the updating of this G4. However, a few Star Wars fans may have been mildly annoyed by the Star Trek switchover at the end.
Episode I References:
Yikes! Power Mac G4 History (including G4 image credit)
http://www.apple-history.com/g4pci
https://en.wikipedia.org/wiki/Power_Mac_G4
Hard drive click of death:
http://harddriveclicking.net/hard-drive-clicking/click-of-death
Sabrent USB 3.0 TO SATA/IDE 2.5/3.5/5.25-INCH Hard Drive Converter With Power Supply & LED Activity Lights [4TB Support] (USB-DSC9):
https://www.amazon.com/gp/product/B00DQJME7Y/ref=s9_acsd_hps_bw_c_x_7_w
Hard Drive Jumper Settings - Use Cable Select (Default):
https://support.wdc.com/knowledgebase/answer.aspx?ID=981
Episode II References:
Dropbox Drops HTML Rendering:
https://www.dropbox.com/help/files-folders/public-folder
120GB SSD Kit from OWC (including SSD image credit):
https://eshop.macsales.com/item/OWC/SSDMXLE120/
IDE/SATA converter board (including image credit):
Episode III References:
Installing Apache 2 on OS X 10.4:
http://hints.macworld.com/article.php?story=20051214031718251
Apache HTTP Server, version 2.4 info:
Apache Portable Runtime (APR) project:
Xcode history:
https://en.wikipedia.org/wiki/Xcode
Perl Compatible Regular Expressions (PCRE):
Expat, a stream-oriented XML parser library written in C:
Yum, package management utility for Linux:
https://en.wikipedia.org/wiki/Yum_(software)
Info about the equivalent to apt-get or yum on Mac OS X:
https://unix.stackexchange.com/questions/80711/how-to-install-apt-get-or-yum-on-mac-os-x
Homebrew:
Macports:
Tigerbrew:
https://github.com/mistydemeo/tigerbrew
Libtool, a generic library support script:
https://www.gnu.org/software/libtool/
Chasing an error for “libtoolize”:
https://unix.stackexchange.com/questions/118550/autoreconf-fails-with-cant-exec-libtoolize
Apt-get, advanced packaging tool:
https://en.wikipedia.org/wiki/APT_(Debian)
The very awesome StackOverflow pages where I found countless help and tips:
Episode IV References:
Ruby, a programming language, good for scripting:
Curl, a cool tool for transferring data with URLs:
Git, a distributed version control system for managing code projects. Seriously, if you are creating code, from C++ to verilog (yes, this also applies to hardware engineers!), you need Git!
Everyone, remember where we parked. You didn’t really think I’d finish with a Star Wars reference, did you?
https://www.youtube.com/watch?v=Yh8u59A54So
Skype Alias Security Hole
If you are a Skype user, and you haven’t turned off your old Skype alias (i.e. your old username), this is how you can improve your Skype account security. Microsoft is not proactive about telling Skype users about the security vulnerability that comes from continuing to use old Skype usernames. This security vulerability can be exploited by hackers to take over your account even if you are using the newer linked Microsoft account's improved security questions, and even if you are using two-factor authentication!
Here’s how to fix the Skype username/alias security hole.
- Log into Skype via a browser
- Go to Account Settings (bottom of the screen)
- Where it says Microsoft account, if you see an URL to link your Skype account to a Microsoft account, follow the link. (If you don’t see this URL but instead see that your account is already “Linked”, skip step 4 and go to step 5 and log in to your Microsoft account.
- Microsoft will present you with a screen to sign in. Make a new account and create it with your preferred email address. It won’t be the same as your old Skype username (a non-email address), but you can make it the same as your primary Skype email contact. Fill in the answers to any questions for the setup process. Once you have finished, you will be in your new Microsoft account. You should be at the following URL, https://account.microsoft.com. You may also see live.com along the way; this is also a Microsoft domain.
- At this point, you should be logged in to https://account.microsoft.com. If you don’t see the Account info page, pull down your username button in the top right and go to view your account info.
- Select “Security”. This will present you with three options: Change Password, Update Info, and Review Activity. If you haven’t updated your password in years, you should update to something more secure that has never been exposed in a database breach. You can Review Activity if you want to check to see if someone else has been trying to get into your account. The one we’re going to focus on for the alias fix is hiding under Update Info. Click in.
- At this point, you may get prompted to confirm you are you. It will present you with your email options (partially obscured) and phone. Select your desired contact, get the security code, and confirm you are you.
- Finally, you will be able to see the actual Security Settings on your account. This should include at least one email, preferably more than one. You can also put your phone number. If you want to change or add any emails, select “Add security info”. The phone option will give you the chance to choose text or voice, so you don’t have to feel restricted if you have an old fashioned non-text phone here. The tool will walk you through a standard verification process - delivering a code to the desired email or phone for you to input and confirm.
- After you’re satisfied with your settings, you can go into “Change alert options” to configure where notifications go. I figure the more, the better, when it comes to security.
- Finally, and this is critical, go to the “more options” URL cunningly hidden at the bottom of the Security settings page. It’s subtle, isn’t it? You really have to be looking for this stuff. Bad layout, Microsoft!
- You will be presented with a number of additional security/recover options.
- Here, set up the Recovery Code. The tool will generate a long code. PDF the email and maybe even print out a hard copy. Save the info somewhere you’ll be able to find it in five years if you need it!
- If you have a smart phone, consider setting up the verification app.
- Now, to fix the alias issue. Click “Manage sign-in options”. You’ll be promted to provide your password again before getting access.
- You should see two options. The first will be your new primary account, an email address. This will be checked and grayed out, meaning it is fixed and can’t be changed in this window. The second will be your old Skype username or alias. Disable the checkmark next to your old Skype username!
- Save your change.
- If you like two-step verification, you can set that up here. If you opt to use it, remember that you can’t use the online recovery form if you need to in future and you may be more restricted if something does lock you out of your account, and if you lose access to your recovery device such as your phone. Bear in mind, that if you don’t turn off the old Skype alias, even if you install two-step verification, a hacker can still get into your account using old info!
- Back in your Skype application, you will need to log out and then back in under the new Microsoft account email. Because you’ve disabled the old Skype alias, you will no longer be able to log in that way. (Likewise, if you have the alias enabled, which is the default state after merging the Skype and Microsoft account, you will still be able to log in the old way. This leaves your old account open for exploitation by a savvy hacker!)
That’s it for disabling the old Skype alias. The Microsoft account will also give you options for other mundane tasks like changing your profile picture, name, sign-in email, phone numbers, etc. For example, if you need to change to a new email address for your actual login, this is where you do it. It appears that you can even set up more than one email for logging in. If you do change to a new email at some point, you should make sure you clean out any old email addresses (and phone numbers) that aren’t active anymore, and of course recheck your alias settings in the security settings to make sure they don’t present future back doors.
It’s also worth noting that some of the Skype settings are still held separately from the Microsoft account, such as billing, so you will probably need to continue doing maintenance to those features back in Skype. But security and password management appears to be handled from the Microsoft side where they’ve tried to unify control.
How did I get the idea to write this post? My husband’s skype account got hacked, and because the account was so old, Microsoft’s automated recovery mechanisms failed to work on recoverying it even though we had the original email address tied to the account. I tried for three days to recover the account without luck. During that process, I learned about the gory history of Skype security flaws and the completely useless customer service Microsoft/Skype provides to users who get hacked or otherwise locked out. If you have one of these old Skype accounts that you still use, even occasionally, you should take the extra step to disable the old alias. Be sure to update your password to something new and secure. And make sure you take advantage of the newer security recovery features, because if you fail to set them up, there is literally nothing you can do to get back in if you lose access. And heaven forbid if you have credits or money in there - you’ll have to cancel your credit card and say goodbye to your active credits if you get locked out by a hacker. Skype won’t refund money.
Before this experience, I was a regular Skype user and had a paid subscription, due to cheapness and convenience. I’ve now decided to abandon the service, and will opt for using Facetime or Facebook’s calling feature instead.
References:
From 2017:
"For those users that linked their Skype accounts to Microsoft accounts, the former Skype password is still activated. This leaves a security hole that can be used to break into your account and use it as you would.”
https://www.onmsft.com/news/skype-accounts-are-getting-hacked-and-its-a-problem
From 2016:
"The Microsoft employee had used two-factor authentication, but hackers were able to log in using an old Skype username and password combination.”
https://www.theverge.com/2016/11/8/13561024/microsoft-skype-baidu-linkedin-hack
From 2012:
"Skype has disabled its password reset capability after hackers discovered a serious security hole that could let anyone take control of an account by knowing its email address.”
https://www.theguardian.com/technology/2012/nov/14/skype-password-account-hack-reset